Art Guidelines.
Art guidelines & resources
Print-ready artwork enables a smooth and prompt printing process and the highest-quality results.
Designers’ knowledge may vary regarding the nuances of preparing artwork for the digital printing process; however, if the fundamental guidelines are followed, our experienced prepress team can efficiently work with your supplied artwork files.
If you don’t already have a graphic designer, we are happy to recommend a selection of designers we work with frequently.
Artwork Requirements
- Files are required in a press ready pdf format.
- If you have embellishments in your design, we also require your layered Adobe Illustrator files.
- All files should be in CMYK colour mode.
- Leave spot colours in your artwork if you would like us to colour match.
- If your artwork is in RGB, please convert prior to submitting.
- All artwork requires a bleed of 1.5mm around all sides.
- Artwork must have a minimum of 1.5mm clearance between the dieline and your text and images - the safe zone.
- All text should be a minimum of 5pt.
- All font to be converted to outlines.
- All images to be a minimum of 300 DPI (dots per inch).
- Please embed all images into the file.
- All artwork that is to be printed on a clear or metallic material must be submitted with a separate white layer specifying the content that will print with white ink.
- White ink should have a spot colour called “white ink”.
- If you require assistance or alterations, please submit all working files including fonts and links.

Roll direction
If your labels are applied automatically or by a thermal printer, it’s essential to specify the roll direction required by your machine so we can set up to print your labels accordingly.
There are eight ways to wind lengths of labels onto a roll. Please view or download our roll direction chart and check your machine specifications.
Colour
Colour management is a crucial element in the printing process. Understanding the basic colour models in print is important when producing artwork to achieve the consistent result you are after.
RGB colour mode is the one most people are familiar with as it is the one used in all our digital applications. RGB uses three colours: red, green, and blue and works with light to create a full-colour effect. As the CYMK colour mode works with a psychical substance, ink, and RGB works with light there are colour variations.
CMYK is the colour mode used throughout the commercial print industry to create the full spectrum of coloured graphics and images. It is also called the four-colour process, a reference to the four ink plates used in some colour printing: cyan, magenta, yellow, and key (black).
For best results, we recommend working with the CMYK colour mode when designing for print. This will help ensure your images and background colours look great, and as intended, from the beginning. Of course, you can convert your artwork from RGB to CYMK, however be prepared for some subtle and not so sutble variations in colour.

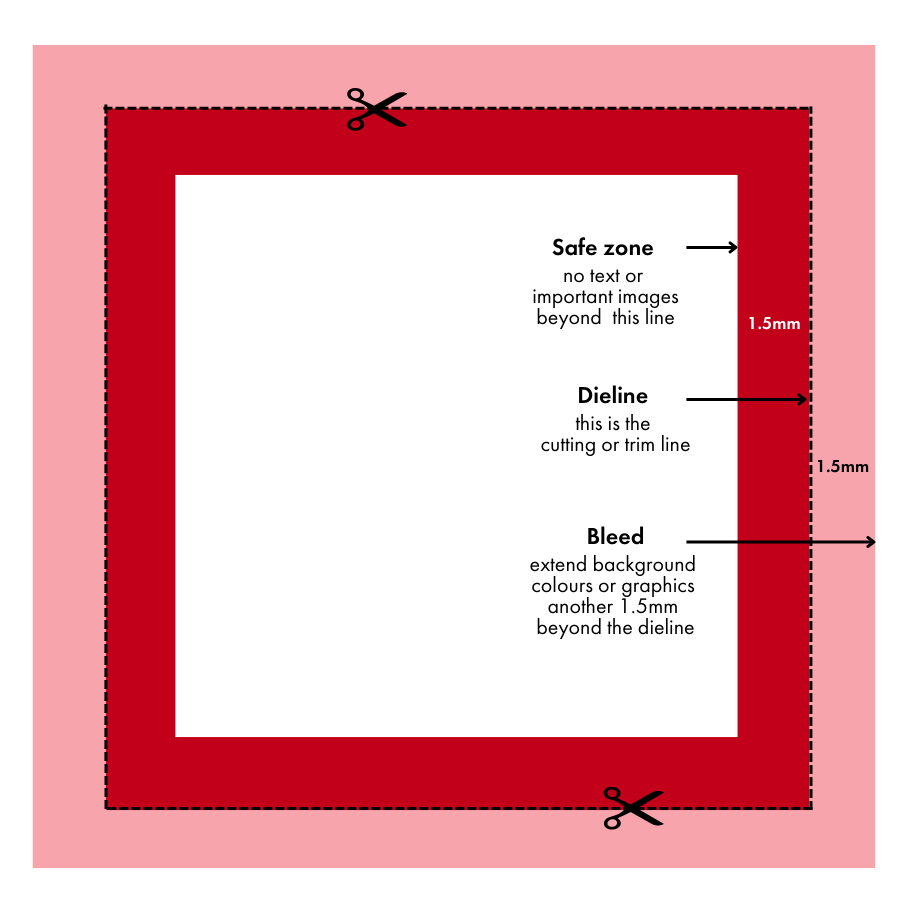
Bleed, Dieline & Safe zones
Your art file not only needs to include your design, it also needs a dieline. A dieline shows where a die or knife is supposed to cut your label or package. Although every effort is made to ensure the die or cutter cuts each label consistently, there is always the potential for variation. And while the dieline is the only one that needs to be included in your art file, two other concepts are good to understand.
- A dieline – maps out the intended cut of the final design.
- Bleed – ensures that there are no accidental white spaces
- A safe zone – that protects design elements
The bleed space is simply an extension of the background of the design, so if the label isn’t cut precisely, it will be hard to tell. The bleed area should be at least 1.5mm around all sides of your design.
The safe zone also allows some latitude by providing a space where essential elements aren’t at risk of being cut. The safe zone should allow 1.5mm of space between the dieline and any crucial elements. You can see an example of these three components to the left.
Fonts & Images
To ensure that the text on your labels, pouches, sachets or rewind prints correctly and clearly, it’s important that:
- all fonts are 5pt or above,
- are created in vector drawing software like Adobe Illustrator (not photo editing software, like Photoshop), and
- are outlined in your art file before submitting to prepress.
Outlining fonts convert each letter into an image. This eliminates the need to submit font files with your artwork and the risk that your fonts are replaced when your file is opened.
If you are including pixel-based artwork, or raster images, these should be embedded into your artwork files rather than linked. Be sure to crop the image to only include the part that is visible in your design to keep the file size to a minimum, in addition to reducing to 300 DPI.

How we can help
We partner with some of Australia’s most loved and trusted brands to craft custom labelling and flexible packaging solutions that help products stand out and be noticed.